! This help is relative to the Version 1 of the Smart HUD. You can find the help about the Version 2 here : Smart HUD V2 Help >>>
Your Smart HUD is delivered within your GA.EG Mesh Head.
This is a very powerfull tool which allows you to deeply and easily configure your head according to your taste!
Find here all the information your need to know about it.
 |
|---|
ULTIMATE EYES Help
NEWS ANIMATED EFFECTS!
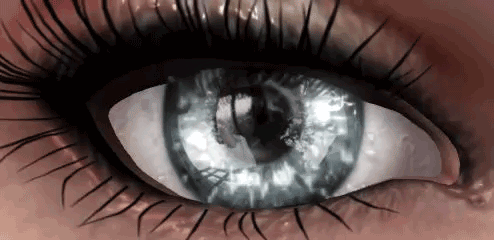
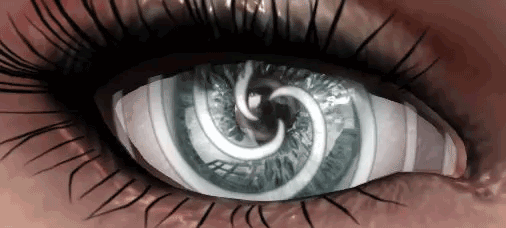
The new Version 3.0 of the GA.EG Ultimate Eyes come with a very exciting feature : The ANIMATED EFFECTS!

If you want to bring incredible effects to your Ultimate Eyes, you need :
-
To update your Ultimate Eyes and their HUD to the new version 3.0.
This page gives you some tips to do the update : How to update my Ultimate Eyes ? -
To get one ANIMATED EFFECTS pack
-
Enjoy!
USEFUL TIPS
! Do not wear your Smart HUD all the time
> To avoid to unnecessarily overload the places where you go, we recommend you to not wear your Smart HUD all the time on your screen.
Just wear it when you need it and then detach it.
ULTIMATE EYES OVERVIEW
The GA.EG Ultimate Eyes are very powerfull and versatile Mesh Eyes that you can deeply customize to your taste.
The GA.EG Ultimate Eyes are made of 6 layers nestling inside each other like the layers of an onion.
From the inside to the outside :
-
The BACKGROUNDS layer
-
The IRIS layer
-
The PUPILS layer
-
The SHINES layer
-
The EFFECTS layer
-
The SHADOWS layer
6 LAYERS FULL OF POSSIBILITES !
The Ultimate Eyes are now also BOM compatible (from V2.0) in [GOLD edition]!
You can now also apply your BOM/Standard SL Eyes on the BACKGROUND layer of your Ultimate Eyes and customize them too if you want!

The Smart HUD that comes with your Ultimate Eyes allows you to fully configure each layer :
-
Texture,
-
Scale,
-
Transparency,
-
Color,
-
Glow,
-
and Brightness.
When you first get your free Ultimate Eyes and their Smart HUD, they are both empty.
A clever system of packs that you install in your Smart HUD let you then freely choose the eyes style you like and customize it to your taste.
MIX AND MATCH YOUR PACKS AS YOU WANT AND CREATE YOUR OWN EYES !
You can create your own eyes : just combine and configure the textures included in your Packs as you want.
Various types of GA.EG Packs are available :
-
EYES PACKS : They contain a complete style of eyes, with various presets and textures such as Bacgrounds, Iris, Pupils, Shines and Shadows.
-
PUPILS PACKS : They contain different types of Pupils textures.
-
EFFECTS PACKS : They contain different types of Effects textures.
-
...

ULTIMATE EYES SMART HUD
Your Smart HUD is delivered within your GA.EG Ultimate Eyes.
This is a very powerfull tool which allows you to deeply and easily configure your eyes according to your taste!
Find here all the information your need to know about it.
PACK INSTALLATION / UNINSTALLATION
Originally, your Ultimate Eyes show a default texture and your Smart HUD is empty.
In order to use them, you first need to purchase and install a GA.EG Eyes Pack.

PACK INSTALLATION
> Wear your Smart HUD
> Wear your Pack Installer
> Click the INSTALLER button and wait for the installation completion
Your Pack is then available for use in your Smart HUD !
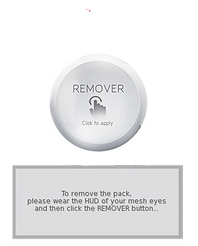
PACK UNINSTALLATION
> Wear your Smart HUD
> Wear your Pack Remover
> Click the REMOVER button and wait for the complete uninstallation.
Your Pack is removed from your Smart HUD !
GENERALITIES

Several buttons are available on top of your HUD :
-
The ORANGE ARROW lets you minimize your HUD on your screen.
-
Click the HELP button to open the help page.
-
The INFO button gives you access to the information page.
-
Click on the POSE button to put your avatar in T-Pose or to free it.
-
The CLOSE button closes/detaches the HUD.

Below, you can see the three main tabs or your Smart HUD :
-
EYES PACKS
-
CUSTOMIZATIONS
-
POS. & SIZES
We detail more these tabs in further paragraphs.
ANIM. PUPILS
This Pupils Animation effect makes your eyes pupils grow and shrink regularly like for real eyes.
> Just click ON or OFF to activate or deactivate the pupils animation.
ANIM. SHINE
This Shine Animation effect makes your eyes shine blink regularly.
> Just click ON or OFF to enable or disable the shine animation.
LOCK EYES
> Click ON or OFF to lock your eyes in a straight ahead position or unlock them.
MATERIAL
> You can display or not the Advanced Material effect on your eyes just by clicking these ON/OFF buttons.
EYES SELECTION
> Select (in orange) one eye or both : All your actions with the buttons below have then effect only on your selection.

CUSTOM PRESETS
These 8 buttons allow you to save your complete eyes settings for a further use.
> Just click on a RECORD button to save all your eyes settings in the corresponding slot: Background, Iris, Pupil, etc... Scale, Color, Transparency, etc...
> Just click on an APPLY button to apply the corresponding saved settings to your Ultimate Eyes.
EYES PACKS
This tab allows you to navigate through the different Eyes Packs you have installed in your Smart HUD and their Presets.
! A Preset is a complete eyes configuration including Background, Iris, Pupil, etc... Scale, Color, Transparency, etc...
> Just click on EYES PACKS to display this tab.

PACKS
You can here navigate through all the Eyes Packs you currently have installed in your Smart HUD.
> Click on the side arrows to scroll through the avalaible Packs.
PRESETS
You can here navigate through the available Presets of the current Eyes Pack and click on the one you want to apply it.
> Click on the side arrows to scroll through the avalaible Presets.
> Click on the picture of the Preset you want to apply it on your eyes.
BOM
You can apply your BOM/Standard eyes on your Ultimate Eyes by clicking this button.
> Click on the BOM button tapply your BOM/Standard eyes on your Ultimate Eyes [GOLD only].
BOM is applied on the BACKGROUND layer of your mesh eyes and all the other layers are cleared.
! Be sure to not wear any Eyes Alpha when using BOM (otherwise your eyes will be full red).
CUSTOMIZATIONS
This tab allows you to fully customize each layer of your Ultimate Eyes independently.
> Just click on CUSTOMIZATIONS to display this tab.
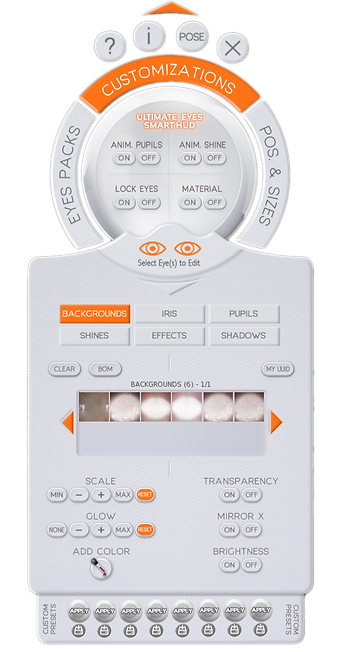
LAYERS
> Just click on the layer you want to customize :
-
BACKGROUNDS
-
IRIS
-
PUPILS
-
SHINES
-
EFFECTS
-
SHADOWS
BUTTONS
-
CLEAR - Lets you clear the current layer.
-
BOM (for BACKGROUNDs only) - Lets you apply the BOM/Standard eyes you are wearing on the BACKGROUND layer.
! This feature is available in the GOLD edition only. -
MY UUID - Lets you apply your own texture on the current layer.
! This feature is available in the GOLD edition only.

TEXTURES
You can here navigate through the Textures available for the selected Layer.
> Click on the side arrows to scroll through the avalaible Textures.
> Click on the Texture picture to apply it on your eyes.
SETTINGS
You can change here numerous settings :
-
SCALE - Lets you adjust the scale of the current layer.
-
TRANSPARENCY - Allows you to adjust its transparency.
-
GLOW - Let you adjust its glow effect as you want.
-
MIRROR X - Allows you to mirror the layer horizontally.
-
ADDITIONAL COLOR - Lets you set an additional color.
-
BRIGHTNESS - Allow you to display the layer in full bright or not.
-
SPEED - Allow you to adjust the speed of the current ANIMATED EFFECT.
! This feature only works with the ANIMATED EFFECTS, not the "static" EFFECTS.
! You can maintain your mouse button down on the - and + buttons to change your settings continuously.
! You can directly change the settings of the current layer without selecting a texture first.
! The SCALE and MIRROR may not work with some ANIMATED EFFECTS.
COLOR PICKER
The Color Picker is a powerful tool allowing you to set an additional color to the current layer.

COLOR CHART
> Pick the color you want in this color chart and adjust its luminance witht the gradient on the right.
The color selected is directly applied on your head.
! Drag your mouse pointer on the chart to see the result on your head in live.
HUE-SATURATION-VALUE
> Use the H, S and V arrows to change the hue, saturation and value of the color.
! Keep the left mouse button down on one arrow to increment or decrement the corresponding value repeatedly.
RGB SET/GET
> Click the RGB Set button and enter in the blue text box the RGB value of the color of your choice.
> Click the RGB Get button and read in the chat the RGB value of the current color.
COLOR PREVIEW
> Click this Color Preview button to apply this color to the current layer.
CUSTOM COLORS
The 10 slots on the left allow you to save your prefered colors.
> Just click on one RECORD button (in red) to save your color in the corresponding slot.
> Just click on one custom color button to apply the saved color.
COLOR PRESETS
The 14 color buttons on the right are helpful color presets.
> Just click on one color preset button to apply the corresponding color.
> To close the Color Picker, click on the CLOSE button.
! To reset the additional color of the layer, just select the WHITE color.
POS. & SIZES
This tab allows you to easily move and resize your Ultimate Eyes as you want.
> Just click on POS. & SIZES to display this tab.

DRAG POSITION
> Just click on arrows of the "trackball" to move your eyes (symmetrically) :
-
Vertically
-
Horizontally
-
In depth
! You can maintain your mouse button down and drag it on the arrows to move your eyes continuously.
> Click the RESET button to rapidly reset the position of your eyes
DRAG ROTATION
> Just click on arrows of the "trackball" to rotate your eyes :
-
Vertically, along the X axis
-
Horizontally, along the Z axis
-
Clockwise or counterclockwise, along the Y axis
! You can maintain your mouse button down and drag it on the arrows to move your eyes continuously.
> Select the OPPOSITE ROT. checkbox to rotate in an opposite way your eyes along the Z and Y axis.
> Click the RESET button to rapidly reset the rotation of your eyes.
SCALE SIZE
> Click on the MIN/-/+/MAX buttons to resize your eyes.
> Click the RESET button to rapidly reset the size of your eyes
! You can maintain your mouse button down on the - and + buttons to resize your eyes continuously.
SYMMETRIZE
> Click on one of these 2 buttons to copy the position, rotation and size of one eye to the other one.
POS. & SIZES CUSTOM PRESETS
You can here save the position, rotation and size of your eyes for a further use.
> Just click on a RECORD button to save your eyes Pos. & Sizes in the corresponding slot.
> Just click on an APPLY button to apply the saved Pos. &Sizes to your Ultimate Eyes.