! This help is relative to the Version 1 of the Smart HUD. You can find the help about the Version 2 here : Smart HUD V2 Help >>>
Your Smart HUD is delivered within your GA.EG Mesh Head.
This is a very powerfull tool which allows you to deeply and easily configure your head according to your taste!
Find here all the information your need to know about it.
#HDGenX SMART HUD V3 HELP
! This help is relative to the #HDGenX Version 3 of the Smart HUD. You can find the help about the other Versions at the Help Center.
Your Smart HUD is delivered within your GA.EG #HDGenX Bento Head.
This is a powerful tool which allows you to deeply and easily configure your head according to your taste!
Find here all the information your need to know about it.

GENERALITIES
Several buttons are available on top of your HUD:
-
Click the HELP button to go to this help page.
-
The WEB button gives you access to the GA.EG Web Site.
-
Click on the TP button to teleport to the GA.EG Main Store.
-
Click on the MARKET button to go to the GA.EG Marketplace.
-
Click on the CLOSE EYES button to close the eyes of your avatar. Click again to release the pose.
-
Click on the OPEN MOUTH button to open the mouth of your avatar. Click again to release the pose.
-
Click on the POSE button to put your avatar in Pose. Click again to release the pose.
-
Click on the MINIMIZE button to minimize the HUD on screen.
-
The CLOSE button closes/detaches the HUD.
! You can also click the GA.EG logo or the minimized icon of the HUD to MINIMIZE it on screen.
Once minimized, you can reopen the HUD by clicking its minimized icon:
On the left of the HUD, click on the different tabs to gain access to the features of the HUD:
Below, the MENU button allows you to open the HUD main menu:


ALPHA LAYERS
The #HDGenX Heads include 3 High Definition layers : EYELIDS, LIPS and BROWS.
! These 3 HD layers support the High Definition addons and appliers but stay compatible with the "normal" addons and appliers !
Due to these 3 HD layers, the #HDGenX Heads do have a total of 6 alpha layers :
-
TATTOO LOW
-
EYELIDS (HD)
-
LIPS (HD)
-
TATTOO HIGH
-
BROWS (HD)
-
LASHES
The previous GA.EG Layered Heads do have a total of 9 alpha layers. So, in order to keep the backward compatibility with the existing GA.EG Addons and Omega Appliers, the layers are automatically redirected as following :
-
TATTOO -> TATTOO L
-
HAIRBASE -> TATTOO L
-
EYELIDS -> EYELIDS (HD)
-
LIPS -> LIPS (HD)
-
UPPER -> TATTOO H
-
LOWER -> TATTOO H
-
BROWS -> BROWS (HD)
-
LASHES -> LASHES
! So it may happen that applying an hairbase removes freckles or that applying eyeliners remove blushes....
PARTS & LAYERS TABS
The 11 first tabs correspond to the different parts of your head :
-
FACE : Face & Ears
-
MOUTH : Mouth & Tongue
-
TEETH : Teeth
-
TATTOO LOW (full head layer) : Tattoos, Hairbase, Freckles, Beauty Marks...
-
EYELIDS : HD or not Eyeshadows
-
LIPS : HD or not Lipsticks
-
TATTOO HIGH (full head layer) : Blushes, Eyeliners...
-
BROWS : HD or not Brows
-
LASHES : Alpha Lashes
-
3D LASHES : Mesh Lashes
-
EYES : Mesh Eyes
When you click on one tab, the Smart HUD displays a page with all the information relative to the corresponding part.
Each page are cut into 4 sections.
LAYER NAME & BUTTONS
The top of the page displays the name of the current tab and several buttons which varies depending on the tab.
CLEAR BUTTONS
> The CLEAR buttons allow you to totally clear the corresponding elements.
SHOW / HIDE BUTTONS
> The SHOW / HIDE buttons allow you to display or hide the corresponding elements.
If the button is green, this indicates that the element is visible.
EARS SHAPER BUTTON
> The EARS SHAPER button is specific to the FACE tab and opens the Ears Shaper menu.
This menu allows you to change the angle and tip shape of your ears.
TEXTURES & MATERIALS
The second part of the page proposes various PRESETS according to the current tab.
The presets are predefined textures and material settings delivered within your head.
The presets are different for each tab:
-
skin materials for the FACE tab,
-
mouth & tongue textures for the MOUTH tab,
-
teeth whiteness for the TEETH tab,
-
lipsticks textures for the LIPS tab,
-
lashes styles for the LASHES tab
-
...
> Simply click on one of the presets buttons to apply it.
! When a preset is selected, the CUSTOMIZATION settings in the section below are automatically updated accordingly.


COLOR SETTINGS
The third part of the page offers you the possibility to change the settings of the current part of your head.
The COLOR tab gives you access to the following settings:
-
the COLOR of the applied texture,
-
the TRANSPARENCY of the applied texture (if available),
-
the GLOW of the applied texture,
-
the BRIGHTNESS of the applied texture,
-
the GLOSSINESS (glossiness value) of the applied material,
-
the INTENSITY (glossiness intensity) of the applied material,
-
the HUE (glossiness color) of the applied material,
-
the ENVIRONMENT of the applied material.
! In order to fully benefit of the Advanced Materials effects, the 'Advanced Lighting Model' and 'Bump mapping and shiny' settings should be checked in the Graphics Preferences of your viewer.
! The effects of the material settings depend on the material textures (shininess/specular and bumpiness/normal) currently applied.

POSITION SETTINGS
The POSITION tab is not available for all the head parts.
When available, this tab allows you to customize the following settings:
-
the POSITION of the applied texture,
-
the SCALE of the applied texture,
-
the ROTATION of the applied texture.
The RESET buttons allow you to reset the corresponding settings to original settings applied.
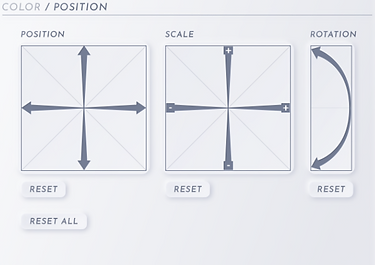
! Take care when you are using the features of this tab. Depending on the textures you are modifying the results may be weird or bad. For example, do not move/scale/rotate an hairbase, due to the SL UVs, this will not work well...
The following video presents you this POSITION tab (new in V3) :
FAVORITES
The last part of the page is really a very useful feature.
For each layer, you can so save your favorite textures and settings and re-apply them later very rapidly.
6 slots are available on each tab to save your favorite configurations:
> Click on one RECORD button (on the top right of a slot) to save your current configuration in the corresponding slot.
> Click on one preview button to apply the saved configuration on your head.
> Click on one DELETE button to empty the corresponding slot.
! You can also save here the textures applied via an Addon or an Omega Applier.

ADDONS TAB
The ADDONS button allows you to access the ADDONS currently installed in your HUD.
The ADDONS feature is a very powerful and versatile tool which extends endlessly the customization possibilities of your head !
It allows you to apply various kinds of lipsticks, beards, hairbases, brows, tattoos, etc... from addons that you could purchase separately at GA.EG.
Once installed you can see and use your addons in your Smart HUD via the ADDONS tab.

! If you have no addon installed, the tab appears empty.
ADDONS LIST
To make it easier, the Addons are grouped by CATEGORIES : BEARDS, BROWS, COMBOS, EFFECTS, HAIRBASES, LIPSTICKS, TATTOOS...
CATEGORIES
At the top, you can see the current category name and index and the total number of categories installed.
> Use the arrows to browse the different categories.
! The categories number and names depend on the addons installed in your Smart HUD.
ADDONS
Below is displayed the current addon, its name and index and the number of addons for this category.
> Just click on one preview button displayed to directly apply it to your head.
> Use the arrows to brows the different addons for the category.


COLOR SETTINGS
This part of the page offers you the possibility to change the settings of the current addon applied on your head:
-
the COLOR of the applied texture,
-
the TRANSPARENCY of the applied texture (if available),
-
the GLOW of the applied texture,
-
the BRIGHTNESS of the applied texture,
-
the GLOSSINESS (glossiness value) of the applied material,
-
the INTENSITY (glossiness intensity) of the applied material,
! The settings displayed depends on the addon preset selected.
! In order to fully benefit of the Advanced Materials effects, the 'Advanced Lighting Model' and 'Bump mapping and shiny' settings should be checked in the Graphics Preferences of your viewer.
! The effects of the material settings depend on the material textures (shininess/specular and bumpiness/normal) currently applied.

SHOW/HIDE TAB
The SHOW/HIDE tab allows you to rapidly and easily show, hide and clear the different parts and layers of your head.

> Just click on one CLEAR buttons to clear the corresponding layer.
> Just click on one SHOW / HIDE buttons to display or clear the corresponding layer.
> The CLEAR ALL / SHOW ALL / HIDE ALL buttons allows you to clear, show or hide all the layers at once.
Please note that the SKIN and MOUTH layers can not be hidden.
! To hide the TEETH, just go in the TEETH tab and click the SHOW / HIDE button.
SAVE LOOK BUTTON
The SAVE LOOK button allows you to save and apply the full look of your head (all parts and layers at once).
> Just click on SAVE LOOK to get a folder containing a very useful HUD called [GA.EG] Head Look Save/Apply HUD.

The [GA.EG] Head Look Save/Apply HUD allows you to save and apply ONE full head look.
> Please refer to the included HELP notecard to know more about how to use it.
! Once one look saved in the HUD, rename it in order to more easily identify the corresponding look.
! You can have as many saved looks (HUDs) as you want.
! You can save each HUD in one or several SL saved Outfits and so retrieve the head look corresponding to your outfit.